A Budget Friendly Fall Decoration

If you’ve read any of my other posts you’ve probably gathered I am a HUGE fan of Fall. It is, without a doubt, my favorite season. I’m not sure if it’s because as a child I loved school and back to school and fall go together like Peanut Butter & Jelly.  Or maybe because I went to Notre Dame where football is life and football starts in the fall. It could be because I LOVE fall clothes and fall scents and fall food – okay, it’s probably all of these things!

That said, I can’t wait to start decorating my house for fall every year – and come Labor Day my house it “Fall-a-fied” which often seems strange since I’m now in the South and it’s still almost 80 degrees here on October 2nd!

I could easily spend hundreds of dollars on fall decor each year but that just doesn’t work for our family – okay, it doesn’t work for my husband and my boys kinda like having food on the table, so I guess that means it doesn’t work for our family. But I still want to add new decorations each year and I want them to be classy and pretty not cheaply made and blah!

Since I love a good Mommy Arts and Crafts project, this seemed like a perfect way to add some fall to our front porch and not break the bank!

What you’ll need:

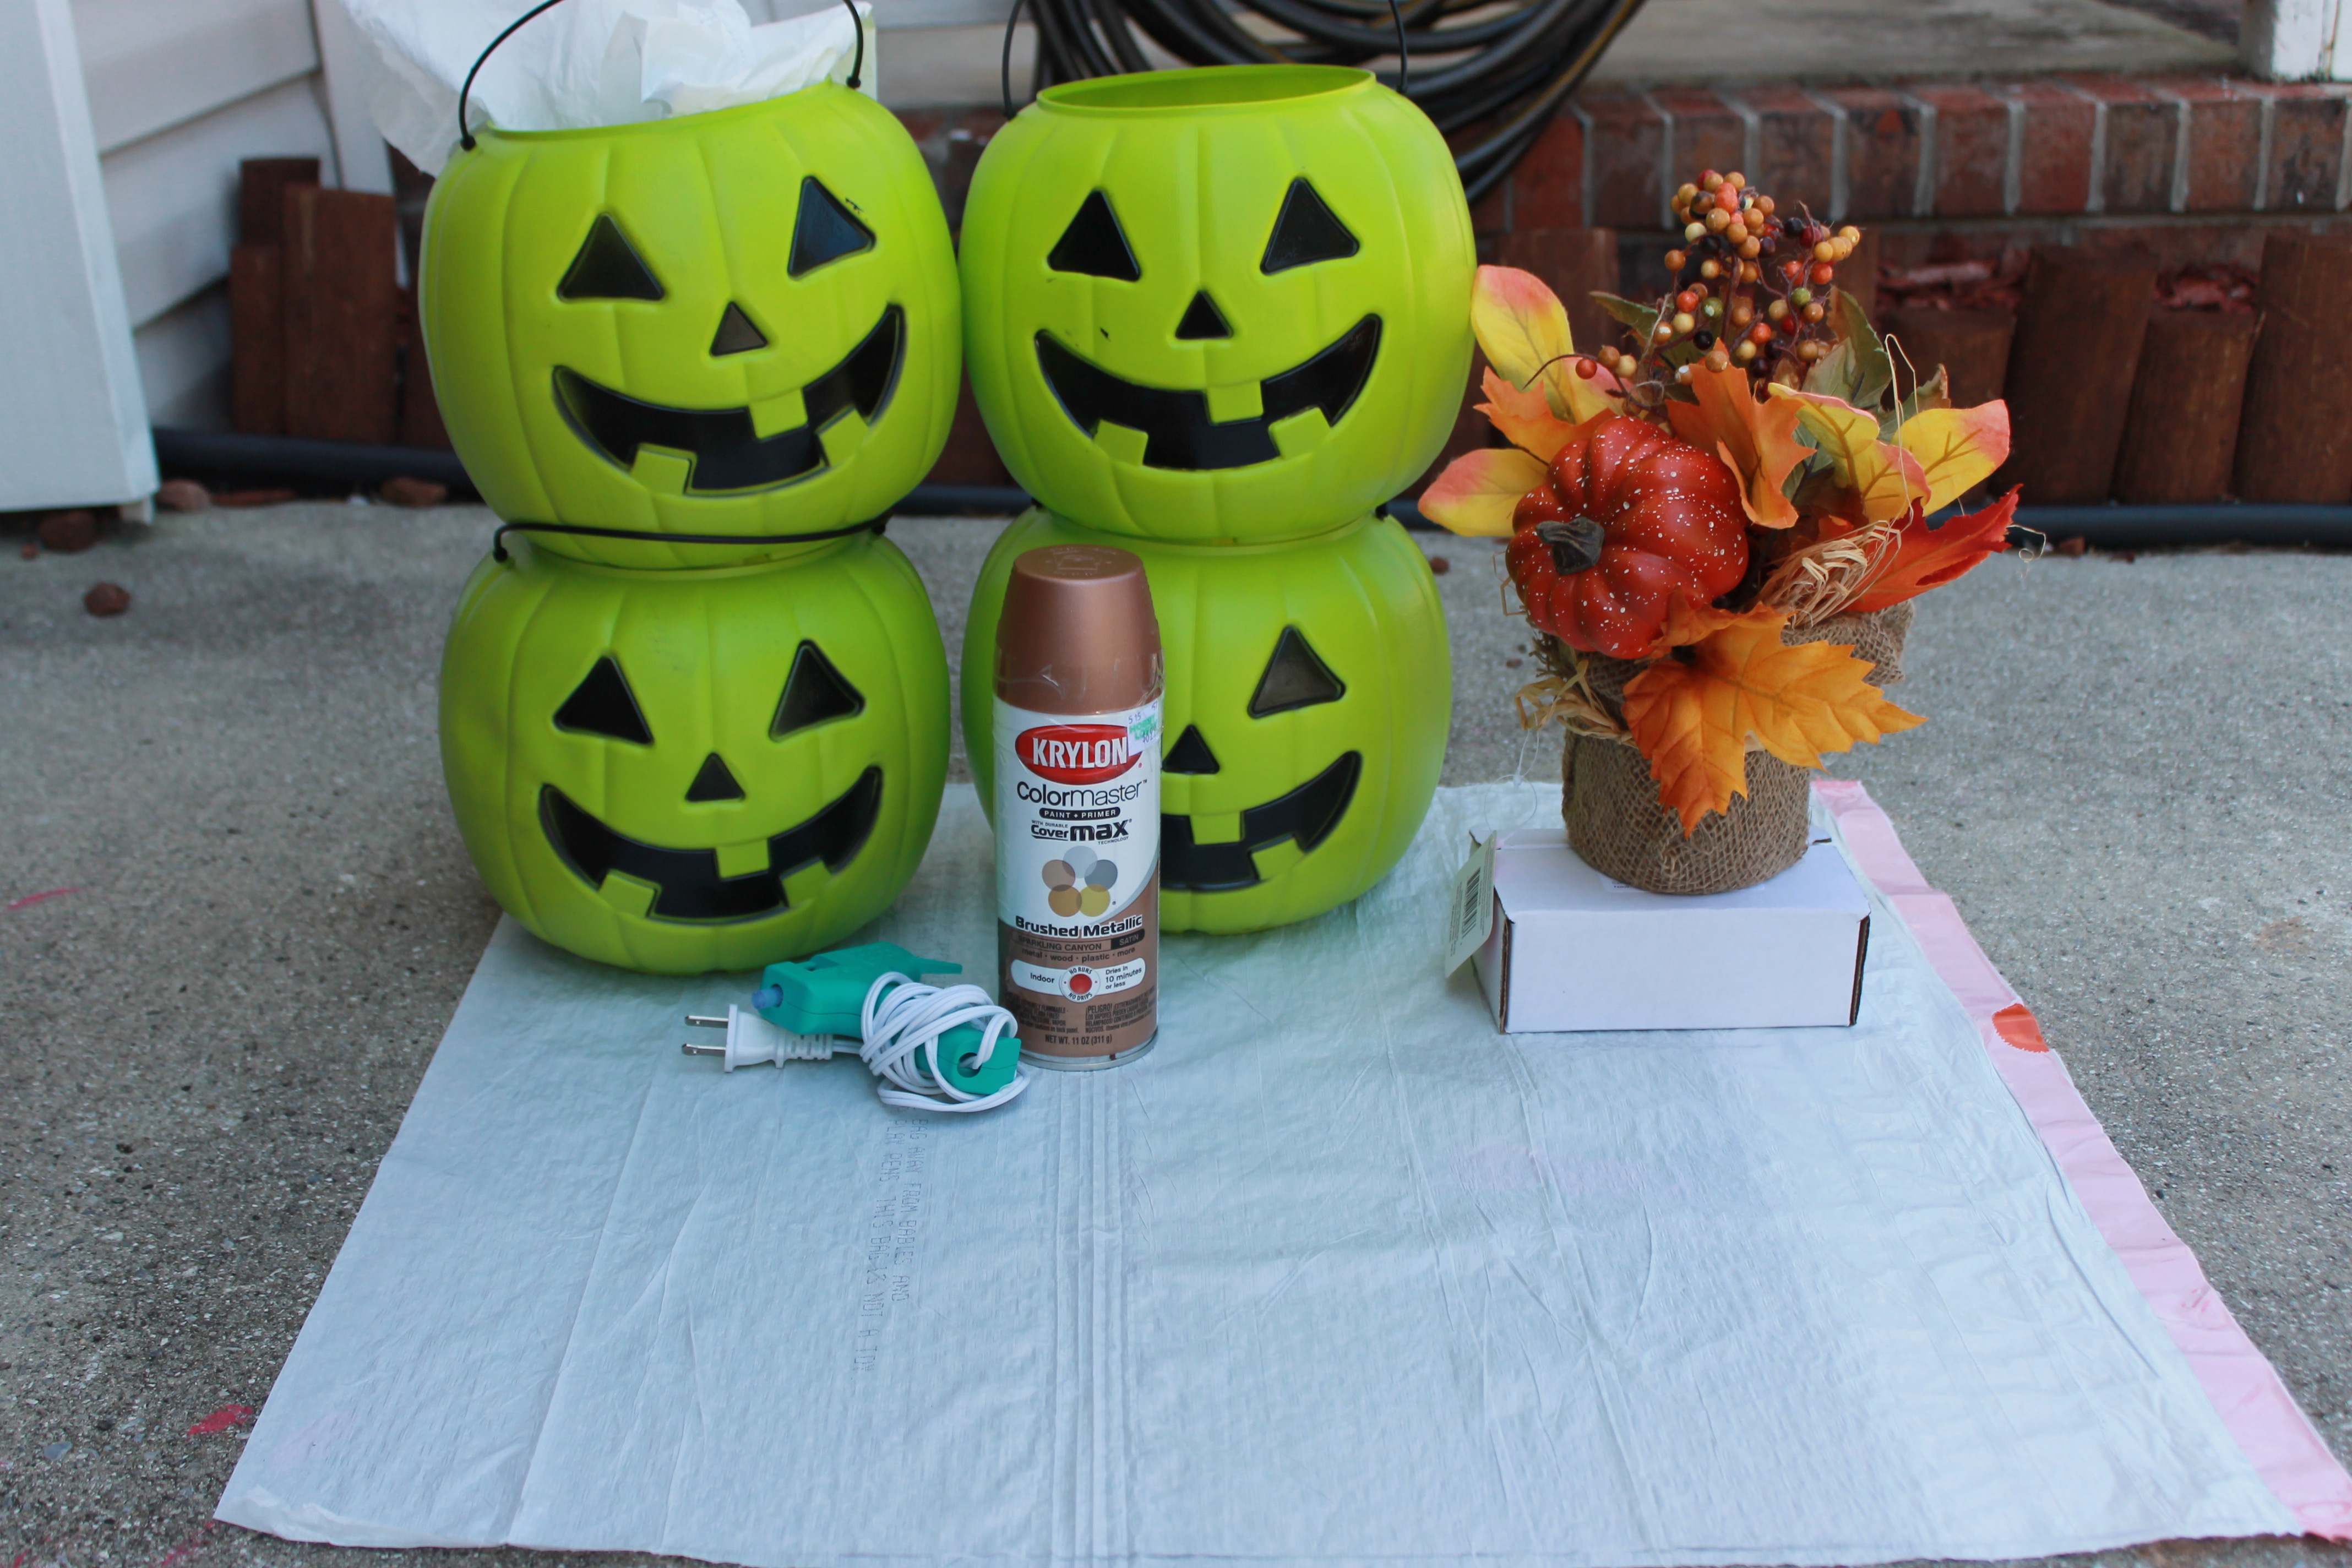
  • 4 of those pumpkin buckets you can get for $1 at Walmart
  • Spray paint of your choice – I used a Rose Gold color that I grabbed for less than $5
  • Some sort of floral arrangement – you could make your own but I grabbed this one at Walmart for under $6.  I ended up grabbing a few of the flower picks and adding them after the fact. Also, you may need something for it to sit on to be the right height.
  • Rocks or something to weigh it down (especially if your’e keeping it outside)
  • Hot glue gun (if you want it permanently stacked together)
  • Permanent adhesive stickers with whatever you’d like on your pumpkins – you could easily skip this step!

Remove the handles from the pumpkins – I had to get our a pair of scissors because those straps are tough y’all!

Get to spray painting! I did several light coats of the spray paint on my pumpkins.  Follow the instructions on your can – mine said to wait a minute between each coat and to wait 24 hours for it to be fully dried!

Originally I filled the pumpkins with some of those landscape brick pieces we have a huge pile of on the side of our house.  Side note: NEVER use those to landscape – they are a pain in the behind to get rid of when you’re sick of them! Even glued together the pumpkin was blowing over so easily.  After MUCH trail and error the bottom pumpkin has a small can of paint in it, the next has a TON of those brick pieces, the third has three tubs of plumber’s putty and the top one has more of the brick pieces.  That seems to have worked best for us but it also means I’m not gluing it together.  That hasn’t been a problem so far!

I made sure to line the faces up and turn them toward the back – they are less noticeable when they are painted but they are still there!

I thought about leaving it plain because it did look nice that way.

But, after much debate, I went with our last name for the top pumpkin and “Happy Fall Y’all” on the remaining three! I used a navy vinyl for everything but our last name – which I just used white.

I LOVE the way this looks (well except for the fact that a round pumpkin makes it hard to apply the vinyl straight when you’re rushing and “fall” is a little off – but from the road it looks okay.)!  It looks like it cost WAY more than the $18 I spent on it.  It was easy enough for me to do during two naps times as well!

I haven’t finished our porch yet – I need to get some fun pumpkins & gourds & maybe flowers to add to the bale of hay!

If you’re looking for something to add a little touch of classy fall to your front porch and not break the bank grab these supplies and spend a little bit of time making this fun pumpkin decor!

Pantry Organization – My Latest (and GREATEST) Organization Project!

This post has been a long time coming!  Before Christmas I started getting really frustrated with how messy our pantry was.  And L’s art supplies.  And the playroom.  And our guest bedroom.  But alas, I digress!  The pantry was in need of some help.  I tried to organize it a little before the holidays but made a promise to myself that after the new year I would do something about it.

I began to pin inspiration and then I started some Amazon Wishlists.  After I priced out my Amazon Wishlist I realized my husband would probably file for divorce if I spent $450+ on reorganizing our small pantry.  With that in mind I changed up my game plan but still ended up with a pantry I love.  No, really, ask Darrin, I talk about how much I love that pantry All. The. Time!

So first things first…what did our pantry look like before?  This wasn’t as bad as it was before Christmas but it still makes me a little shaky just looking at the picture!

{BEFORE}

Disorganized Pantry

So not awful, but take a look at this beauty!

{AFTER}

After - Organized Pantry

And a view from the side:

Organized Pantry

Y’all I am totally in love!  The whole project cost under $200 to complete.  So yes, I get that may seem like a ridiculous amount of money to spend on a pantry but we had some Christmas money and Darrin said I could do what I wanted with it (he really is a gem!).

Now let’s break down what I did so you can recreate my masterpiece in your own house.

I was really, really coveting the OXO Good Grips Pop Containers but since they’re close to $20 each I decided I needed to rethink that aspect.  I ended up going with Better Homes and Gardens Flip Tite storage containers that you can buy at Walmart.  I purchased a few of the sets (4.5 cup, 7.5 cup and 10 cup containers) and then some individually (2 cup, 4.5 cup, 7.5 cup, 10 cup and 11.5 cup).  I really, really like these containers.  I wasn’t too sure of the quality at first but I asked some people who had used them and they had positive things to say.  I’m so glad I went with these and saved some money.  The 3 containers set was only $15!

Pantry Organization Project

Next I needed to get something to hold cereal and oatmeal.  Darrin loves his cereal so I went with two 1.5 gal containers for cereal and another for the oatmeal.  I really like the Rubbermaid Cereal Keepers I ended up choosing! **As a side note, I made sure I put the waffles/pancake mix recipe on the Flip Tite container and the oatmeal cooking instructions on the Rubbermaid container just so I knew I had them.

My baking supplies needed some organizing as well.  I found these great containers at TJ Maxx for my flours and sugar.  I ended up using more Flip Tite containers for the rest of my baking item.

Next up was finding some baskets to store items that I couldn’t put in storage containers.  I ended up finding some really nice nesting baskets at Old Time Pottery for a great price!  I also ended up needing more than I thought so I had to make multiple trips.

Nesting Baskets

I also needed something to hold our tupperware-type containers.  The baskets I bought just weren’t big enough so I made yet another trip to Old Time Pottery and found that awesome black and white bin you can see at the bottom left of the AFTER photo.  It was perfect!

The last step was getting some labels for the baskets.  I had a vision of what I wanted but I couldn’t find them anywhere.  I ended up going with plain Avery Shipping Labels and making them a little fancier with markers!

Here are some more photos of the finished product:

Pantry Organization Project

After3

After it was all said and done I realized I needed to do something about our plastic bags so I hung a 3M hook on the back of the folding door and they fit perfectly!  Plus they are out of sight, which I love.

I also chose not to label most of my storage containers.  This is because what’s in them changes often.  I even keep an empty one or two in the closet to fill as needed.  I didn’t want to have to peel labels off all the time when I went to wash the containers.

The basket containing my oils and vinegars also has honey and hot sauce and a few other things like that.  It can get pretty messy so I made sure to line the basket with some aluminum foil to keep the mess contained and easy to clean up.

I thought about painting the inside of the pantry but didn’t want to have to deal with drying time.  Then I thought about using contact paper to add a design to the walls but after a disastrous experience trying to cover our kitchen table with contact paper I decided to give up that pipe dream and just let it stay white!  Maybe someday, when I do Pantry Organization 2.0 I’ll add some color!

So now our pantry is super organized and finding what I need is so easy.  Plus I know when we’re running low on something and I need to get some more.  And on top of that it’s so pretty to look at and makes me super happy!  I did this several weeks ago and I STILL smile when I open the doors.

Pantry Organization

And there you have it, my organized and easy to use pantry!  Life is just so much simpler when things are organized.  And with a toddler, a husband and three dogs I need all the simple I can get!

DIY Menu Board

So I may be a tiny Pinterest obsessed.  I pin so much, but hardly ever follow through (unless it’s food – I make a lot of Pinterest recipes!)

One of the first things I pinnned when I joined several years, a new house and a baby ago, was a dry erase menu made out of a picture frame.  I pinned it so long ago that I actually cannot find the pin anymore.  I feel like my DIY skills have really matured since then so I could probably try it on my own – and yes, there was a touch of sarcasm in that last sentence!

We had a wall in our new kitchen just begging for something like this so I began the hunt for frames to use – man are big frames expensive!  Then I had a brilliant idea, check out a consignment shop for an old print.  Ten minutes and $6 later I was headed home with this:

IMG_1211

And I ended up with this:

DIY Dry Erase Menu Board Tutorial

I was even able to do most of it during nap time – since paint takes a while to dry, I can’t consider it a one-nap project, but it’s pretty close!

Here is what you’ll need:

Frame

Spray paint

Iron

Fabric

Scissors

Hot glue gun

Ruler or measuring tape

2″ permanent stick letters

1/2″ permanent stick letters

IMG_1214

I forgot to include the spray paint since it was already waiting for me out in the garage!

First things first, remove the backing from your frame (I had to use a knife and cut tape and pry up staples, just be careful if you have this type of frame, but remember no one will see the back.

Second, use a good spray paint (one that includes a primer) to paint the entire frame.  Remember to stay in a well ventilated area (I use our garage with the door open) and to allow it to dry overnight.  If you’re going to need a second coat, read the instructions on the can, but most say to apply the second coat within one hour or after 48 hours.

IMG_1227

While I was waiting for the paint to try I took some extra fabric I had, ironed it (the worst part in my opinion), and measured and cut it to fit the print in the frame.

IMG_1219

I used the glue gun to secure the fabric as I wrapped it around the print.  Putting the print side to the back was a must for me since my fabric was lighter and the print a little dark.  I also tried to make the corners as tight as possible, since it was already a tight fit in the frame.

IMG_1230

Here is an close-up for the corners:

IMG_1231

Then I took the 2″ letters and applied them to spell Menu at the top of the fabric covered print.  What’s For Dinner would also be a super cute header in my opinion!

Next I measured out the spacing for the days of the week. Mine were about an inch apart, but make it even spacing depending on how big your frame is.

IMG_1224

After getting the first day applied, I put the first letter of the remaining days down as a placeholder and I think it made this step a little faster!

At this point it became a waiting game for the frame to dry, but after that it was time to put everything together.

I gave the frame a glass cleaning with some cleaner and then started the assembly process  – glass, then fabric covered print and then the backing.  I had to use the tape to secure the backing (mainly since I didn’t want to get the staple gun out!) but once it was all put together you couldn’t even tell!

Dry Erase Menu

I was so excited to get the menu up and meals for the week added!  I just used a regular dry erase marker to write the meals on the glass – although I do think I need a thicker one to make it easier to see!  This has definitely stopped the “What’s for dinner?” question at our house and will have a place in our kitchen for years to come.


Reverse Etched Glass Canisters

For the past few years we have done a Christmas gift exchange with both of D’s brothers and their wives.  We’ve always given some sort of date night (movies, coffee, etc.) and I was hoping to do something a little different this year.

We pulled D’s younger brother and wife this year who just moved their family from NC to Asheville and are in the process of buying a new home.  I thought doing something they could use in the new house would be a nice change of pace from past gifts.  After a night of playing on Pinterest from 3-5am (thanks L!) I found a pin for etched glass canisters.  I figured that would be the perfect housewarming/Christmas present.  They are very simple and clean (much like my SIL’s aesthetic), practical for a new home, and, most importantly, made with love!

The project was really simple and turned out really well so I thought I’d share it with all of you, just in case anyone else finds themselves in a gift rut!

Here were the supplies I bought:MommaAlwaysKnows Reverse Etching: DIY Glass Canisters

  • Set of 4 GLASS canisters
  • 1/2 self-stick letters
  • Masking tape (not sure how I didn’t have this on hand!)
  • ArmourEtch etching cream

And the other supplies I had on hand:

MommaAlwaysKnows Reverse Etching: DIY Glass Canisters

  • Rubbing alchol
  • Craft sticks
  • A big bucket
  • Gloves (the cream is caustic and you want to avoid any contact with your skin)

I started by cleaning the glass canisters with the rubbing alcohol and then wiping an excess liquid off.

Then I applied the stickers and the masking tape to create the area to apply the etching cream.  You can make the area as big or as small as you like and align the wording anywhere you please.  I like the wording closer to the top and a large area below etched.

MommaAlwaysKnows Reverse Etching: DIY Glass Canisters

After I verified the spelling about 10 times (I even asked D how to spell “tea”) I was ready to etch.  I read the directions on the bottle of etching cream I bought.  They said to only leave the product on for one minute but all the blogs I had read suggested at least 5 minutes.  The directions also said that rising the cream in a porcelain sink will damage it.  We don’t have stainless steel sinks so I decided to rinse into a bucket and then dump the water in the toilet.

I did a lot of Google research as well.  One tip that I found to be really helpful and wanted to make sure to pass along was instead of a brush, use a craft stick (or popsicle stick).  It allowed me to apply a really thick, even layer – this is key to making sure the etched area doesn’t have flaws.

So, applied a thick layer of etching cream and set the timer for 5 minutes.  Every 90 seconds I used the craft stick to swirl the cream around (this removes any air pockets and ensures the entire surface is well covered).

MommaAlwaysKnows Reverse Etching: DIY Glass Canisters

When my five minutes were up I rinsed the canister into the bucket (using a gloved hand to completely remove the cream).  I took the tape and stickers off and then rubbed a bit more alcohol over the area to make sure all of the sticky residue was removed.

I repeated those steps for the remaining canisters. And this was the end result!

MommaAlwaysKnows Reverse Etching: DIY Glass Canisters

A close up:

MommaAlwaysKnows Reverse Etching: DIY Glass Canisters

I decided to fill the coffee canister with some small bags of Starbucks coffee and a Starbucks gift card.  My sister-in-law loves coffee so I figured even if the canisters bombed she’d enjoy part of her gift!

MommaAlwaysKnows Reverse Etching: DIY Glass Canisters

This is a really simple, but impressive, gift idea or for a fun addition to your kitchen.

If you try this project, let me know how it turns out!